
7 posts tagged with "Image Generation"

View All Tags

· 7 min read
DahnM20

Replicate gives you API access to thousands of AI models — image generation, video generation, image editing, audio, and more. The API is clean, but using it in practice means writing a client for each model, handling polling for async predictions, managing file URLs, and wiring outputs from one model into inputs for the next. That's fine for a production service, but it's a lot of overhead when you're iterating on a pipeline.

AI-Flow can be used as Replicate API workflow builder that removes that overhead. You pick a model from a catalog (or type in any model ID directly), the interface generates the input form from the model's schema, and you connect models together visually. No API calls to write, no polling loop, no file handling code.

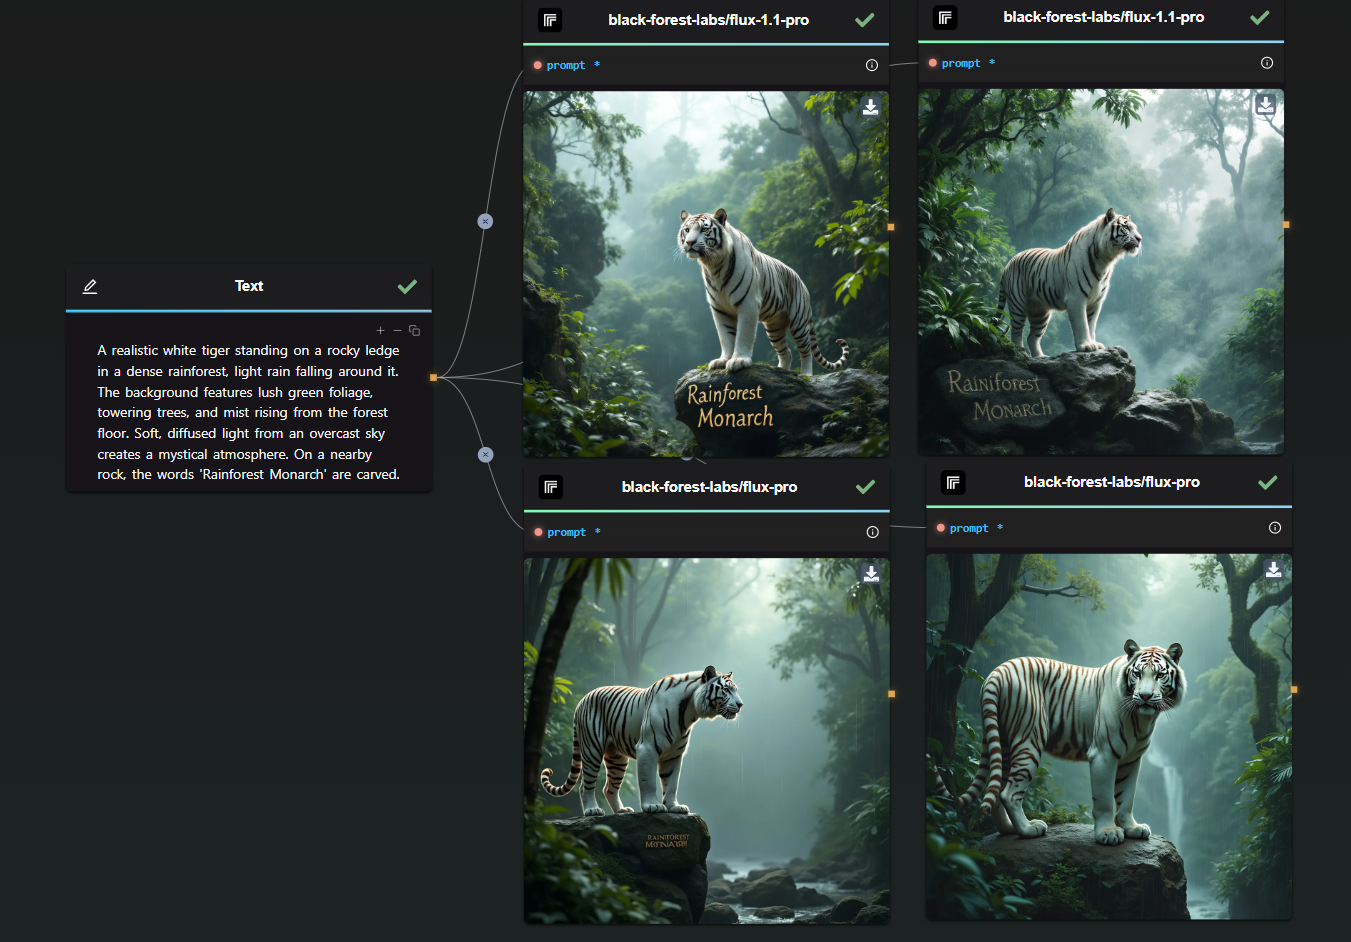
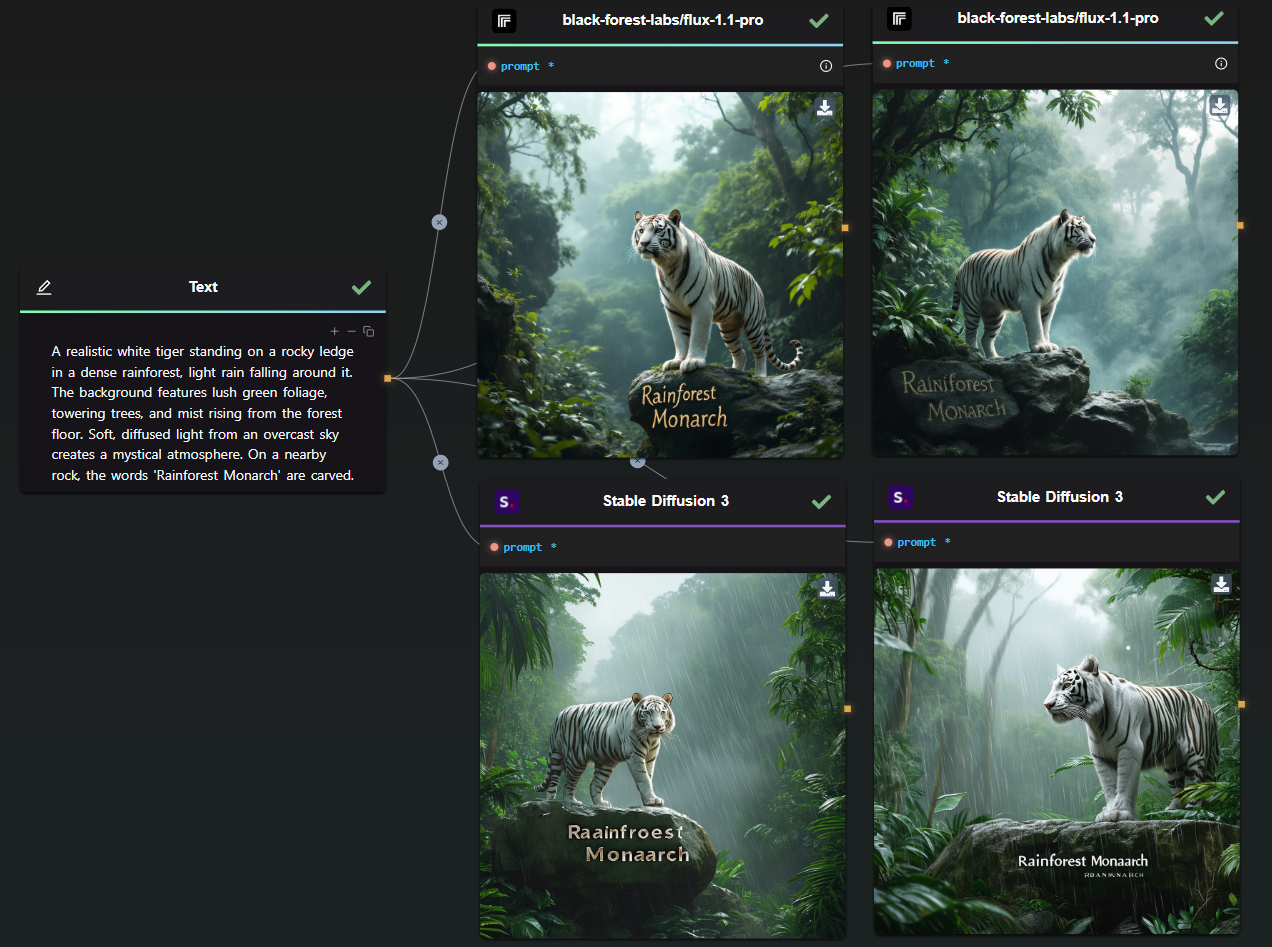
How the Replicate node works

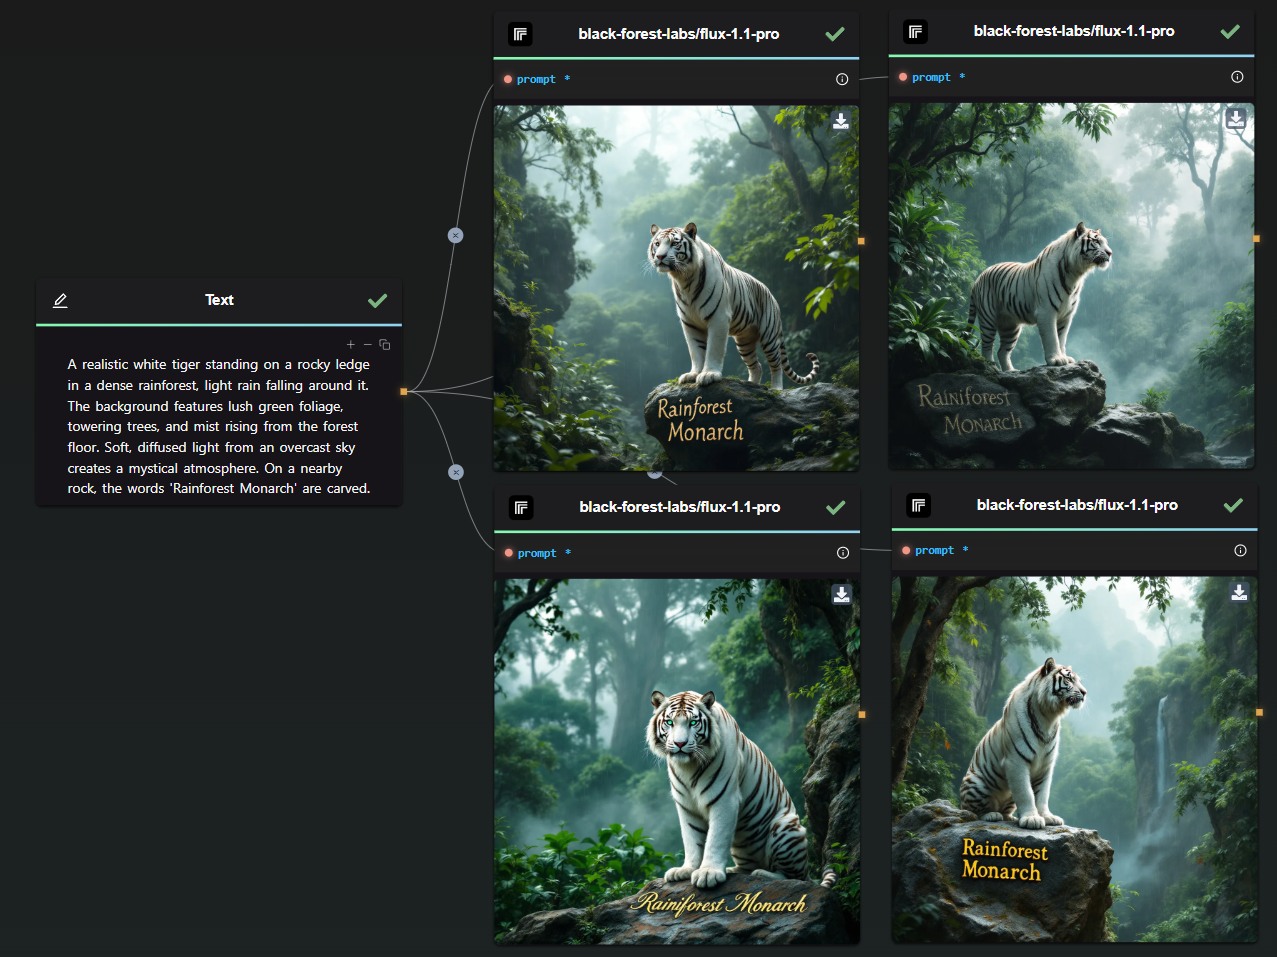
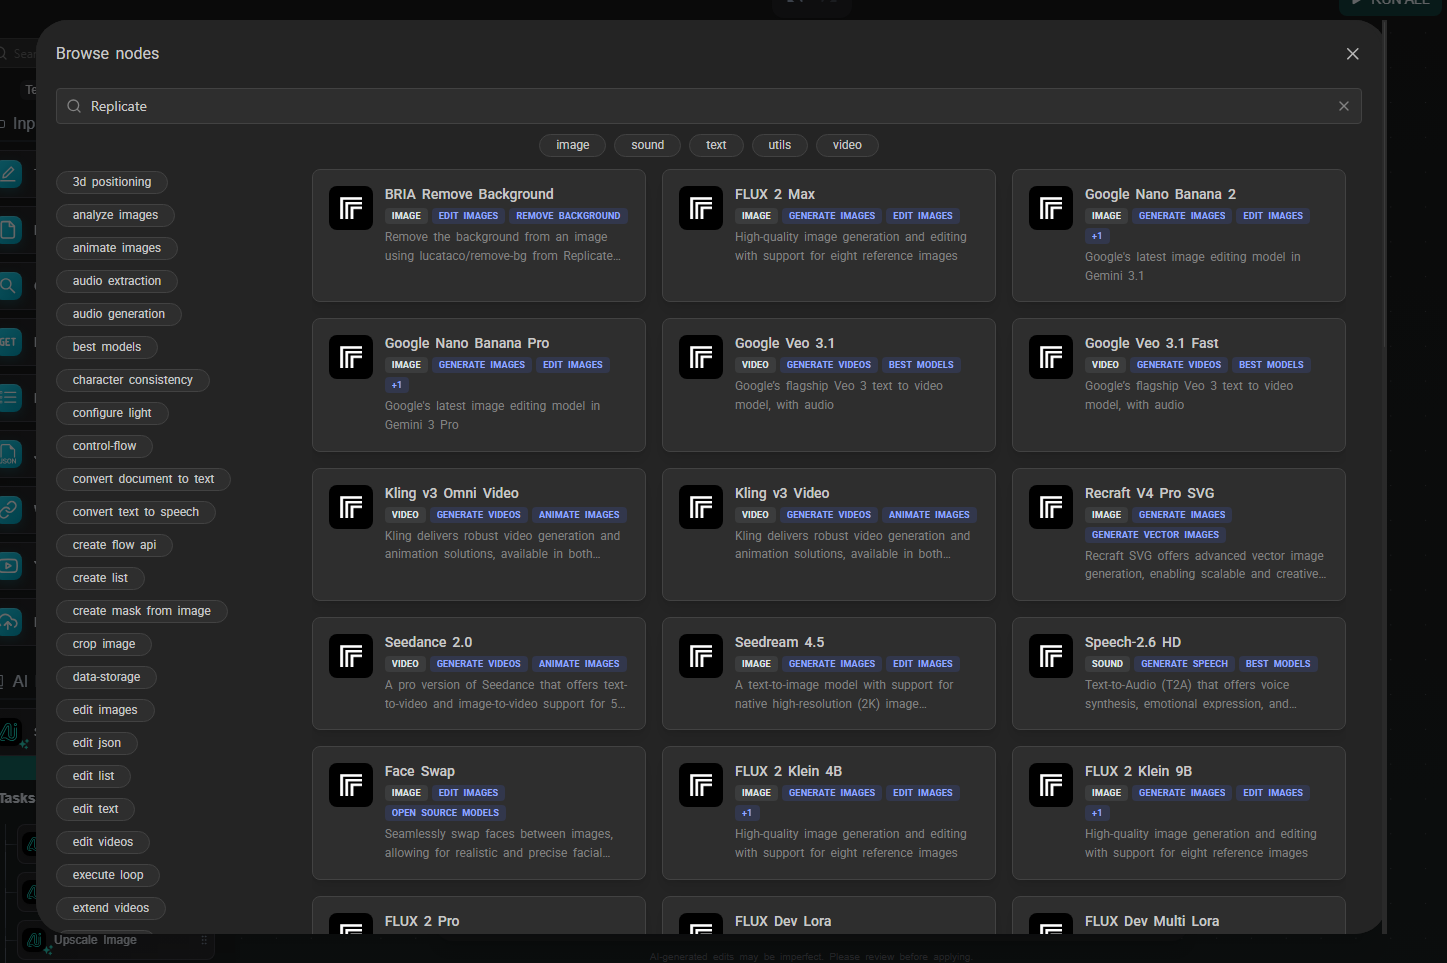
Drop a Replicate node on the canvas. You'll see a model selector with a curated list of featured models organized by category — image generation, image editing, video generation. Pick one and click confirm.

Replicate node model selector

The node reconfigures itself based on the selected model's input schema. If the model expects a prompt, a width, a height, and a num_outputs parameter, those fields appear in the node. Input fields that accept data from other nodes show connection handles, so you can wire outputs directly into them.

If the model you want isn't in the featured list, type the model ID directly in the format owner/model-name (for example, black-forest-labs/flux-2-max). AI-Flow fetches the schema from Replicate and builds the form the same way. This works for any model hosted on Replicate — not just the ones in the curated list.

Your Replicate API key lives in the key store (Settings → Secure Store). Set it once; every Replicate node in every workflow draws from it automatically. With your own key, you have access to the full Replicate catalog.

A few of the models currently in the spotlight catalog:

Image generation & editing:

  • FLUX 2 Max / Pro — Black Forest Labs' latest text-to-image models, high quality
  • FLUX 2 Klein 9B / 4B — faster, cheaper FLUX variants for rapid iteration
  • Google Nano Banana 2 — Google's image editing model (Gemini 3.1), handles style transfer, background replacement, inpainting, object removal, and more from a single prompt
  • Seedream 4.5 — text-to-image from ByteDance

Video generation:

  • Google Veo 3.1 — text-to-video with native synchronized audio (ambient sound, dialogue) baked in; no separate audio node needed
  • Google Veo 3.1 Fast — lower-cost variant, same native audio
  • Kling v3 Video / Omni — text-to-video and image-to-video, with native audio output
  • Kling v3 Motion Control — animates an image following a reference motion trajectory
  • Seedance 2.0 / Fast — ByteDance image-to-video and text-to-video

The catalog updates as new models are released on Replicate.

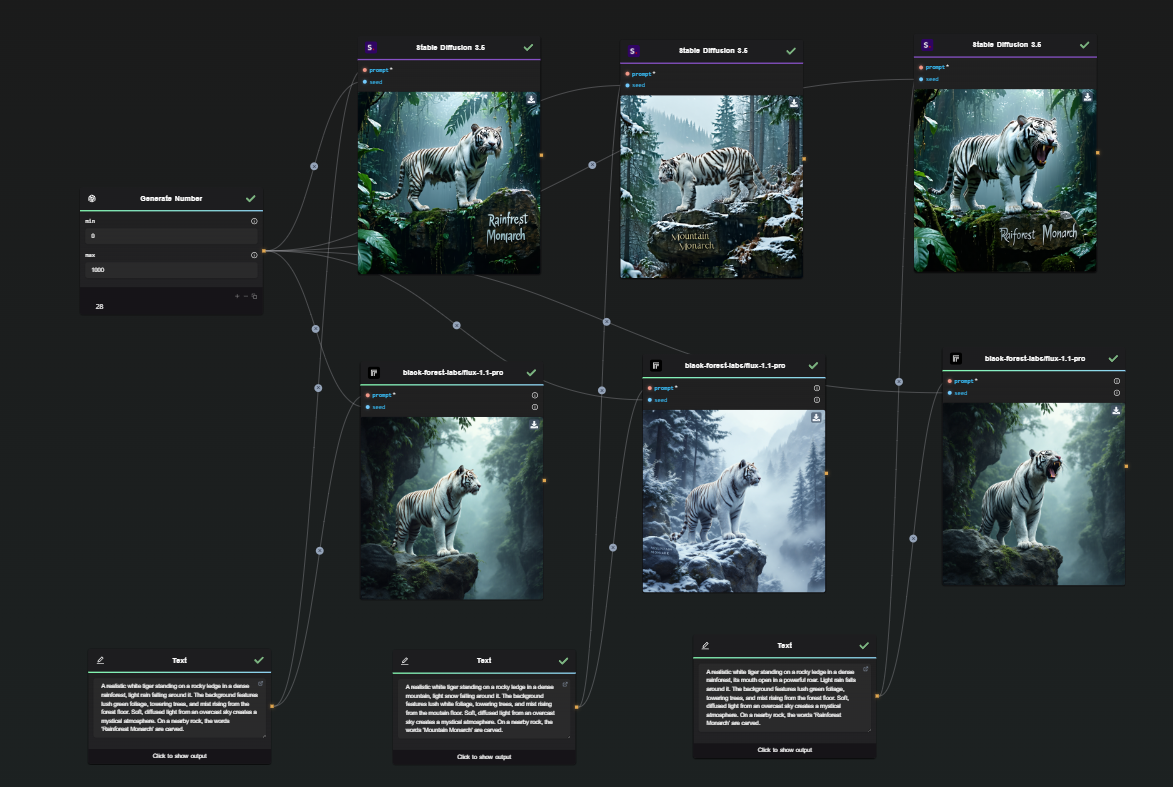
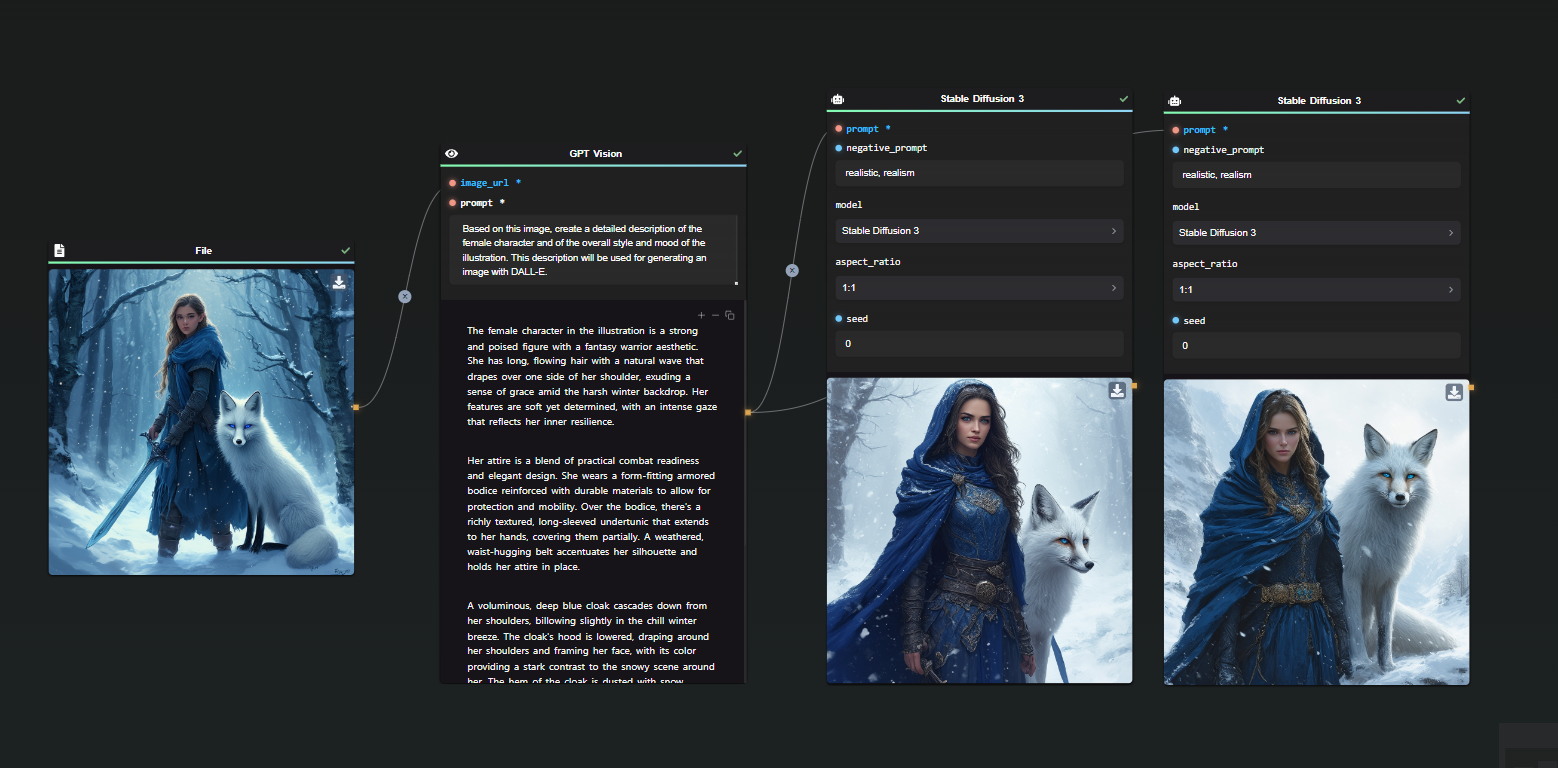
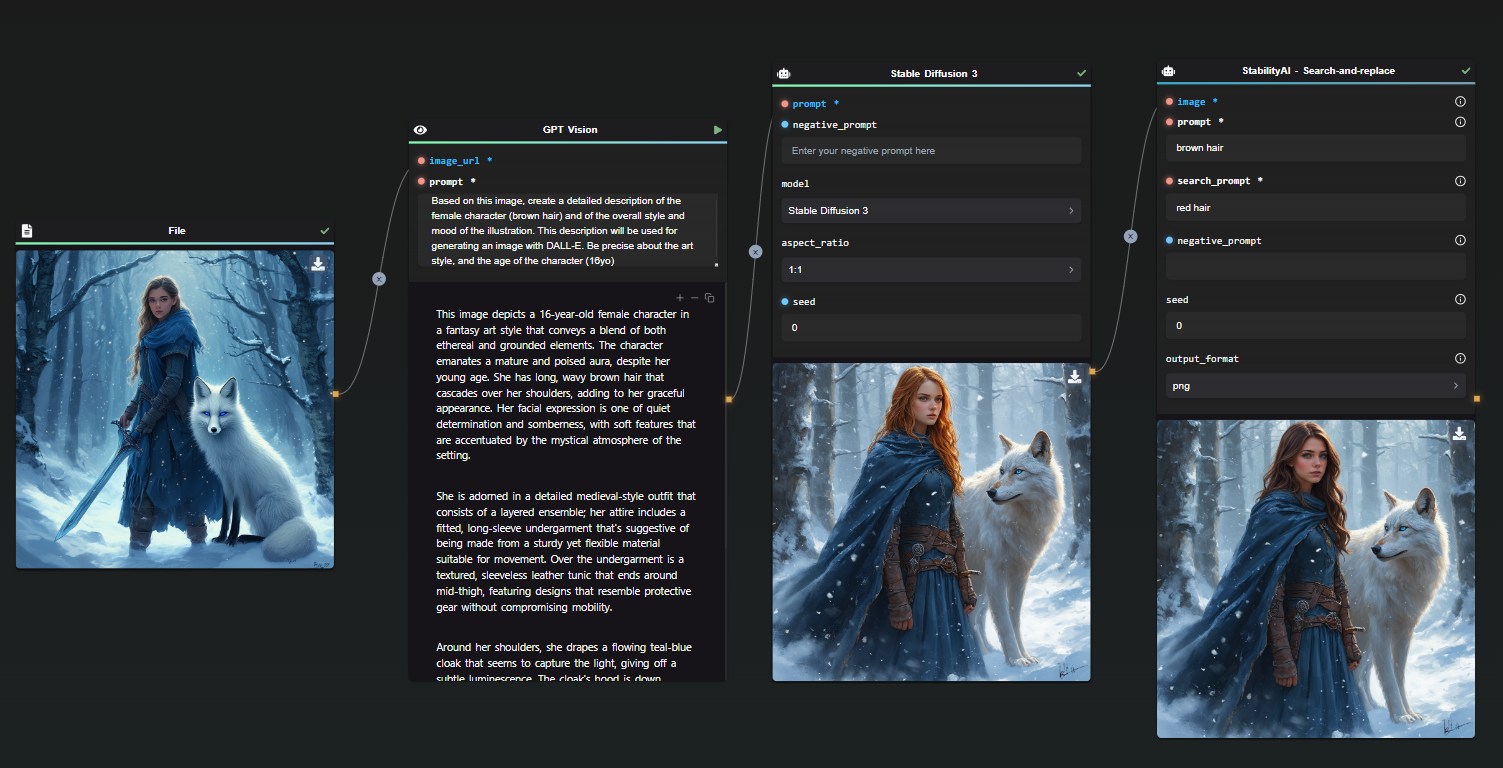
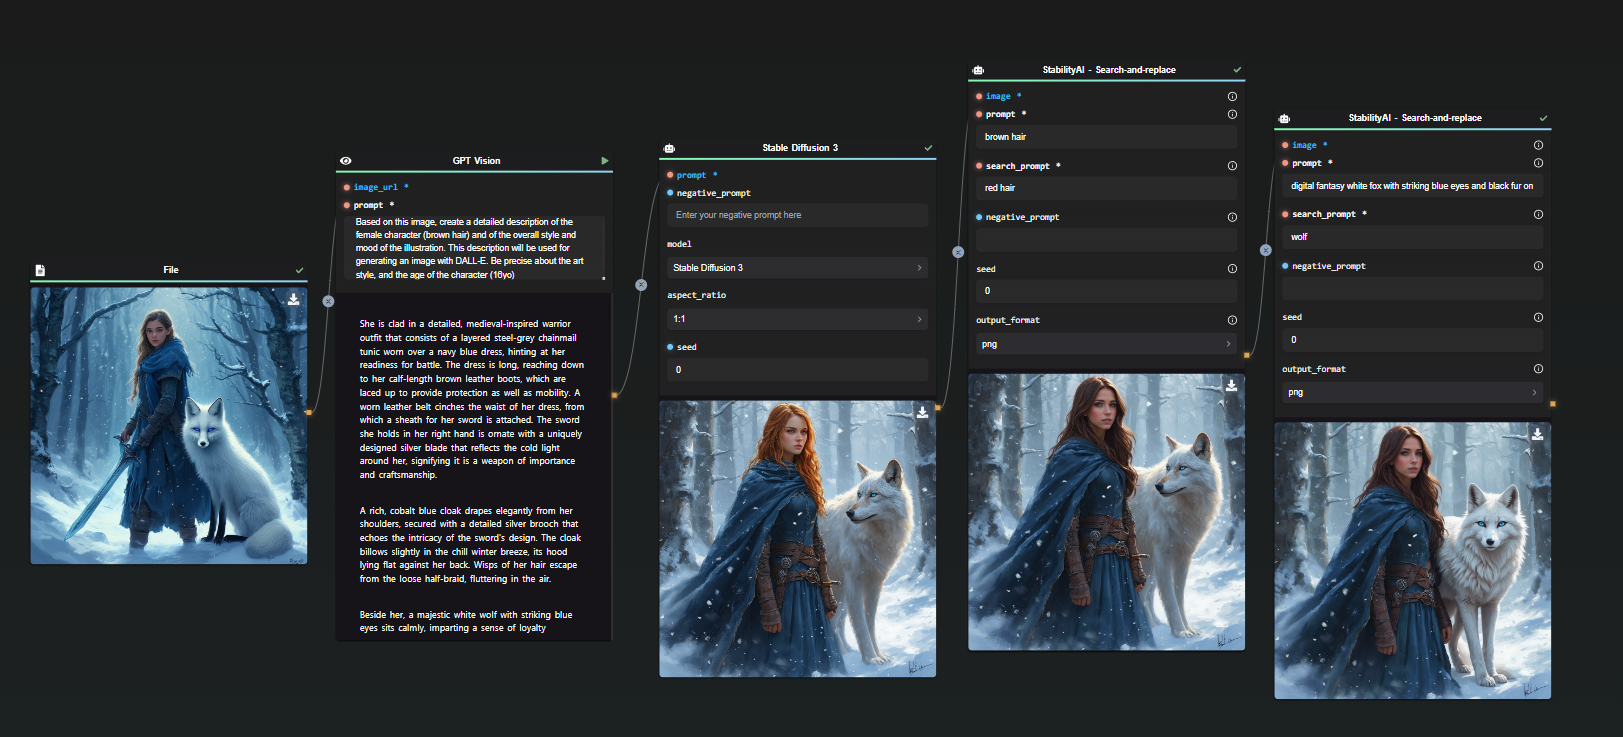
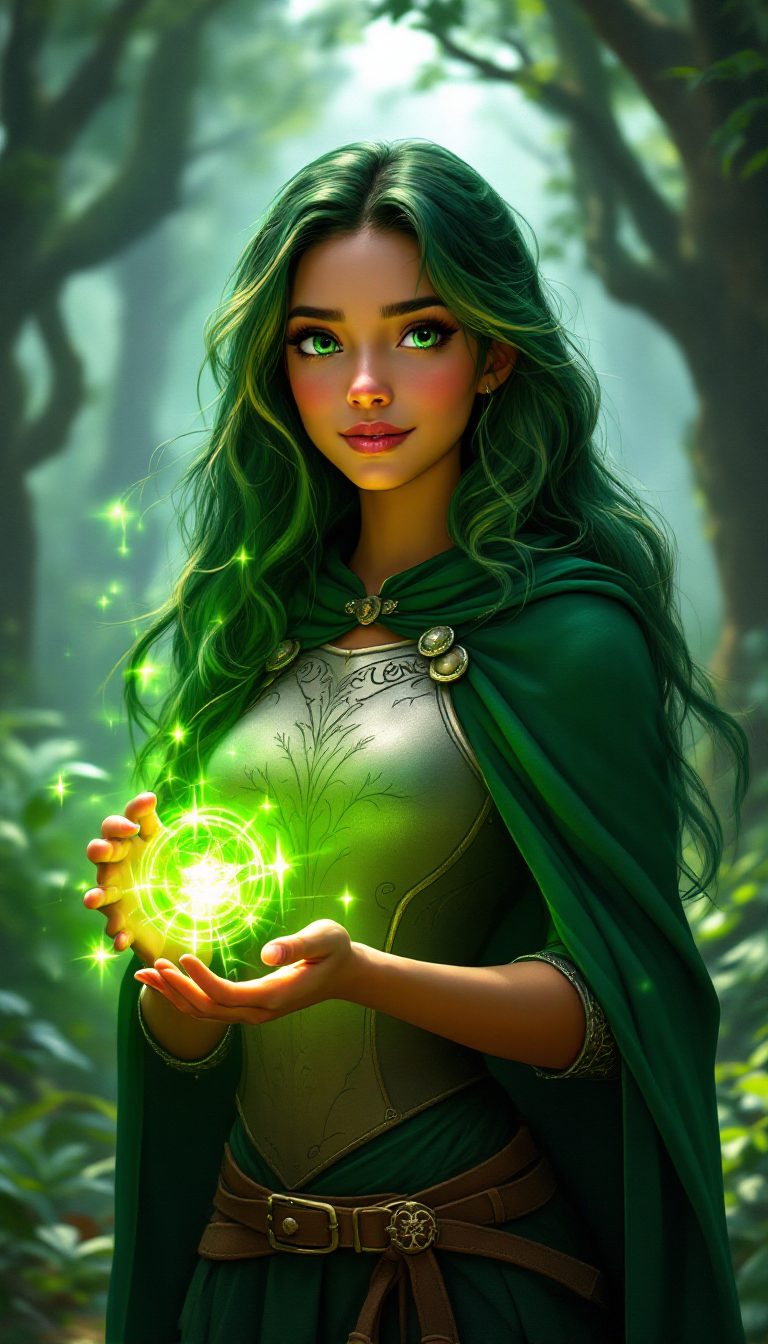
Workflow example: LLM-to-image pipeline

A common use case: use a language model to expand a rough concept into a detailed image prompt, then feed that into a Replicate image model. This avoids the prompt engineering overhead on the image model side and produces more consistent, detailed results.
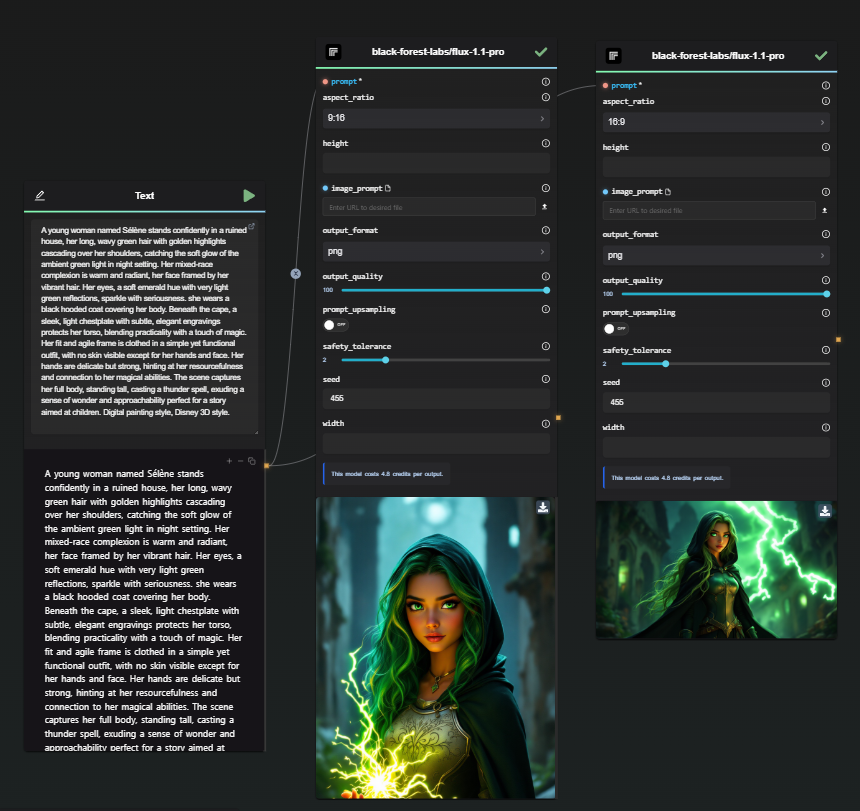
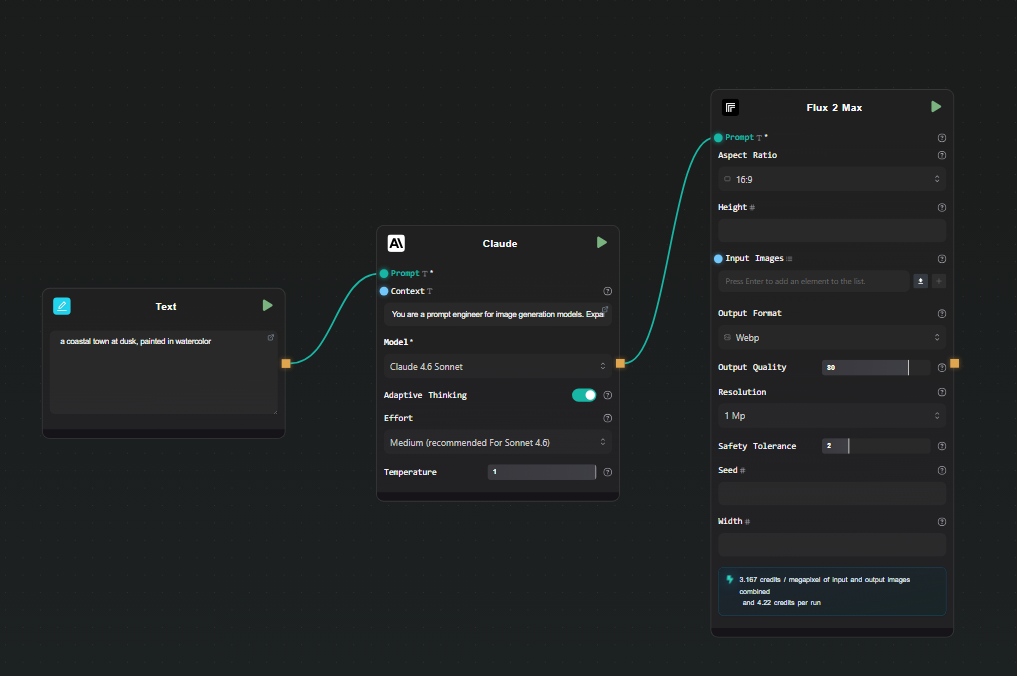
Step 1 — Text Input

Add a Text Input node. Type your rough concept: "a coastal town at dusk, painted in watercolor".

Step 2 — Claude node (prompt expansion)

Add a Claude node. Connect the Text Input output to the Context field. In the Prompt field:

You are a prompt engineer for image generation models.
Expand the concept in the context into a detailed, vivid image generation prompt.
Describe lighting, composition, style, and mood. Output only the prompt, no commentary.

Select Claude 4.6 Sonnet. This gives you a detailed, model-optimized prompt from a two-word concept.

Step 3 — Replicate node (image generation)

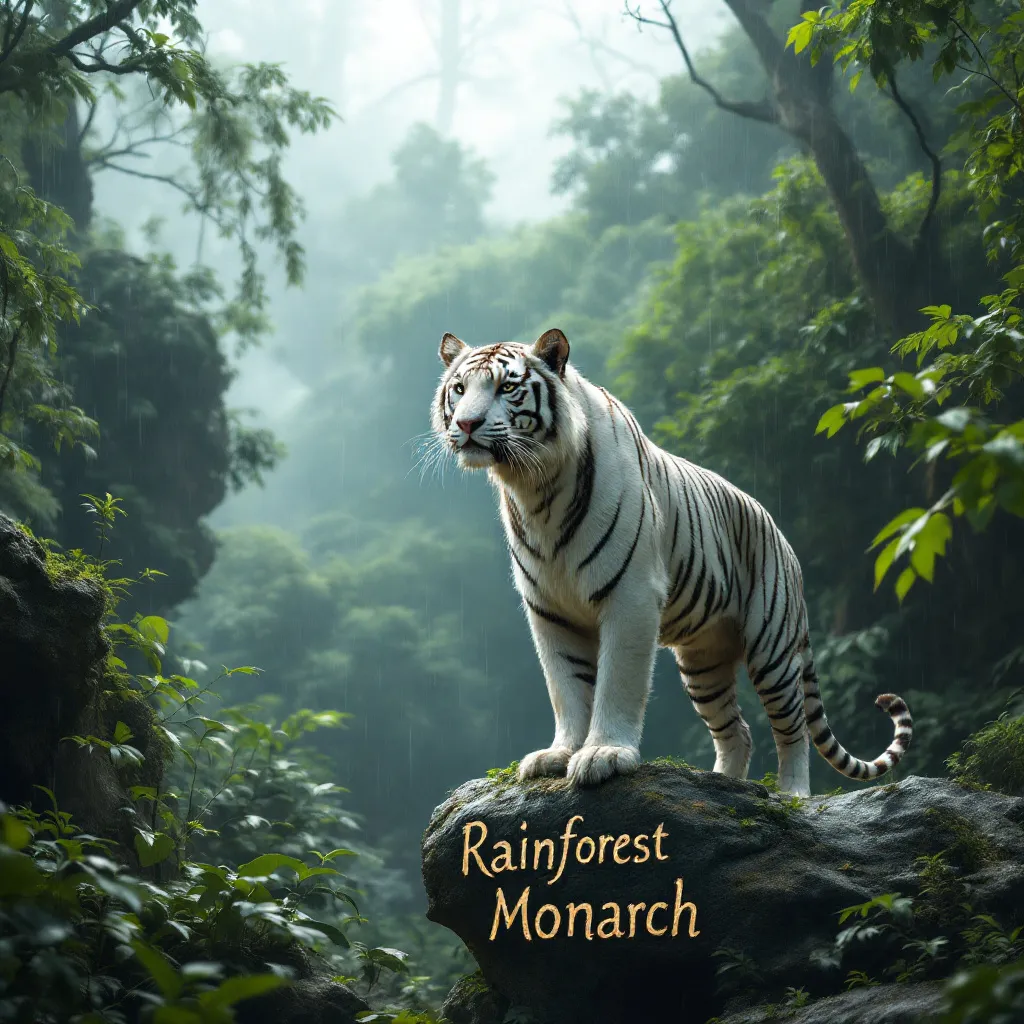
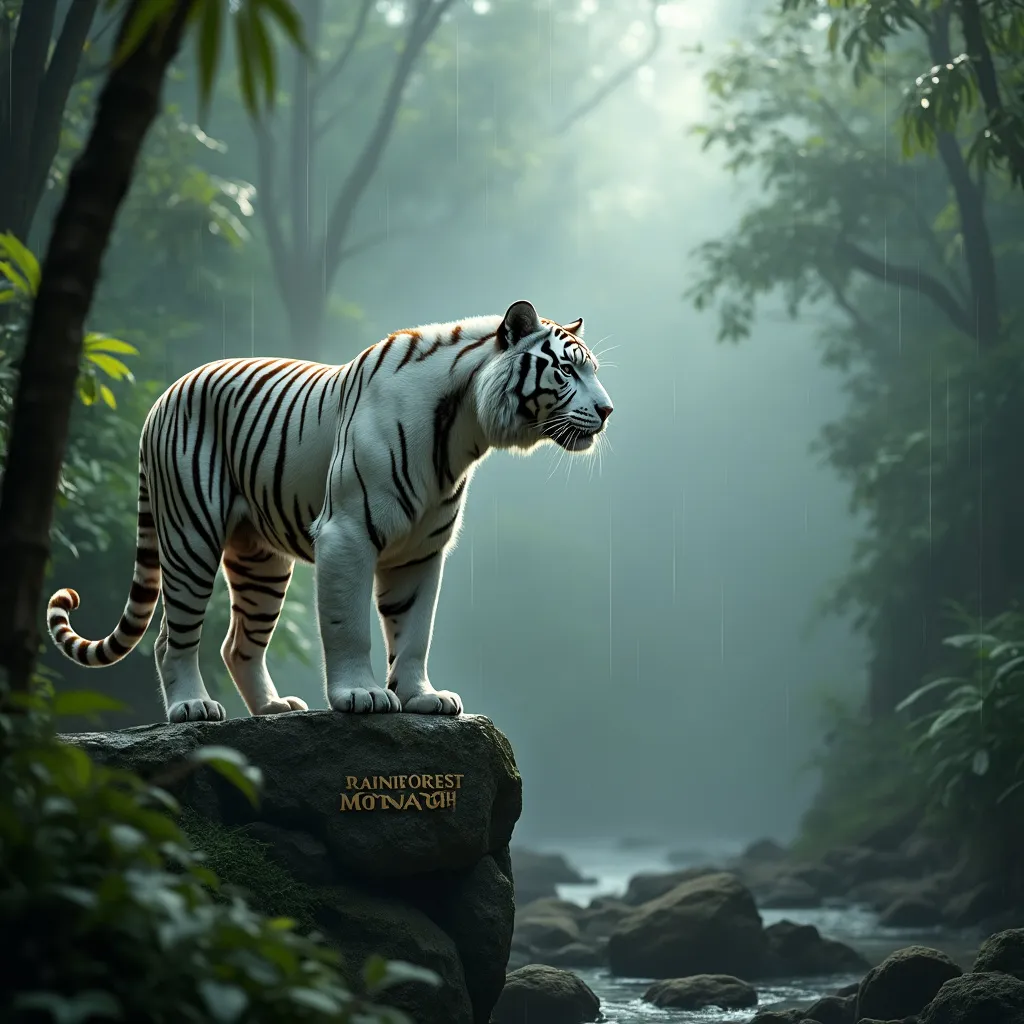
Add a Replicate node. Select FLUX 2 Max from the model catalog. Connect the output of the Claude node to the prompt field of the Replicate node.

Set any other parameters you want — aspect ratio, output format — directly in the node.

Text Input to Claude to FLUX 2 Max pipeline

Step 4 — Run

Hit Run. The pipeline executes in order: your rough concept goes through Claude, an expanded prompt comes out, that prompt goes to FLUX 2 Max on Replicate, and the generated image appears beneath the node. AI-Flow handles the Replicate prediction polling and file storage automatically — you just see the result.

Swap the Text Input content and run again to iterate. Change the Replicate model to compare FLUX 2 Pro vs. FLUX 2 Klein without rewiring anything.

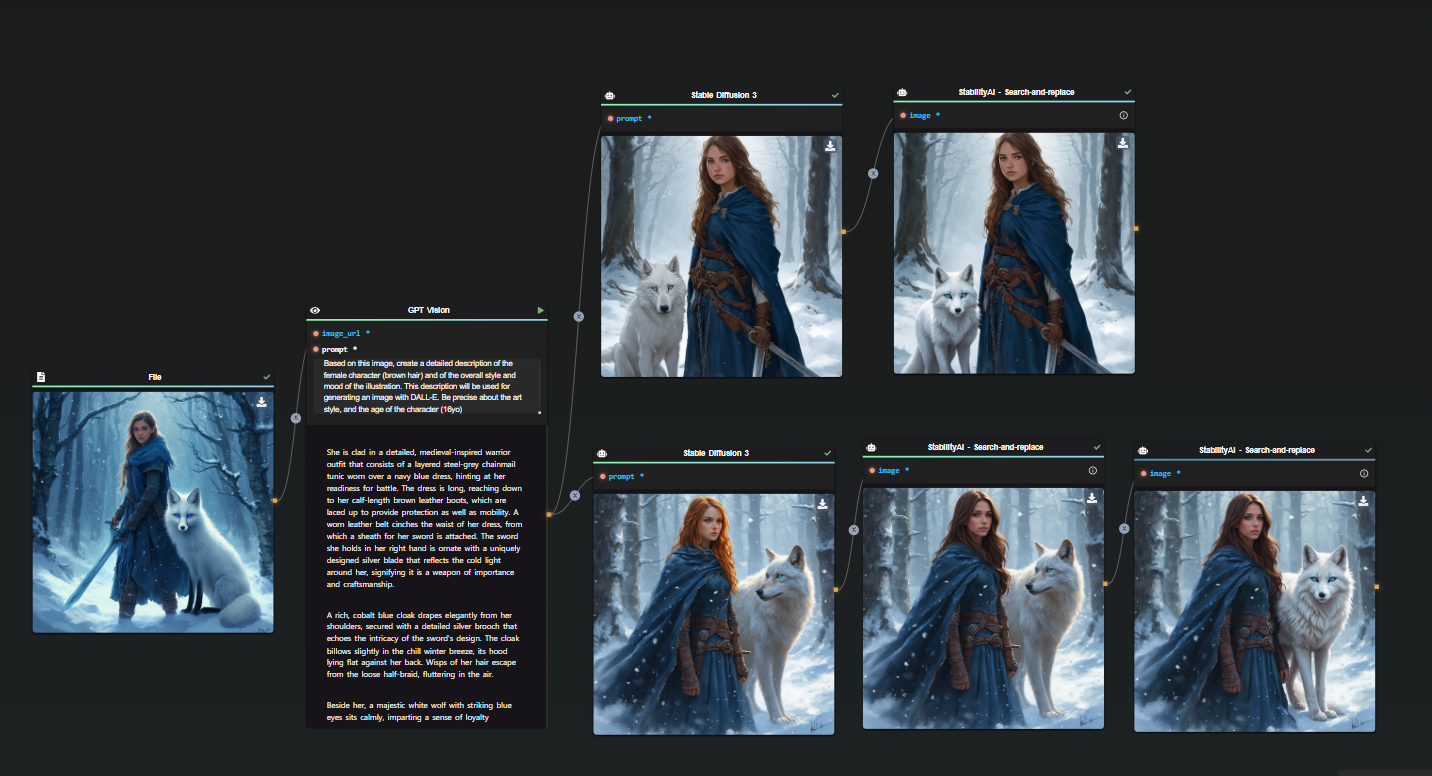
Extending the pipeline

Image editing as a second step

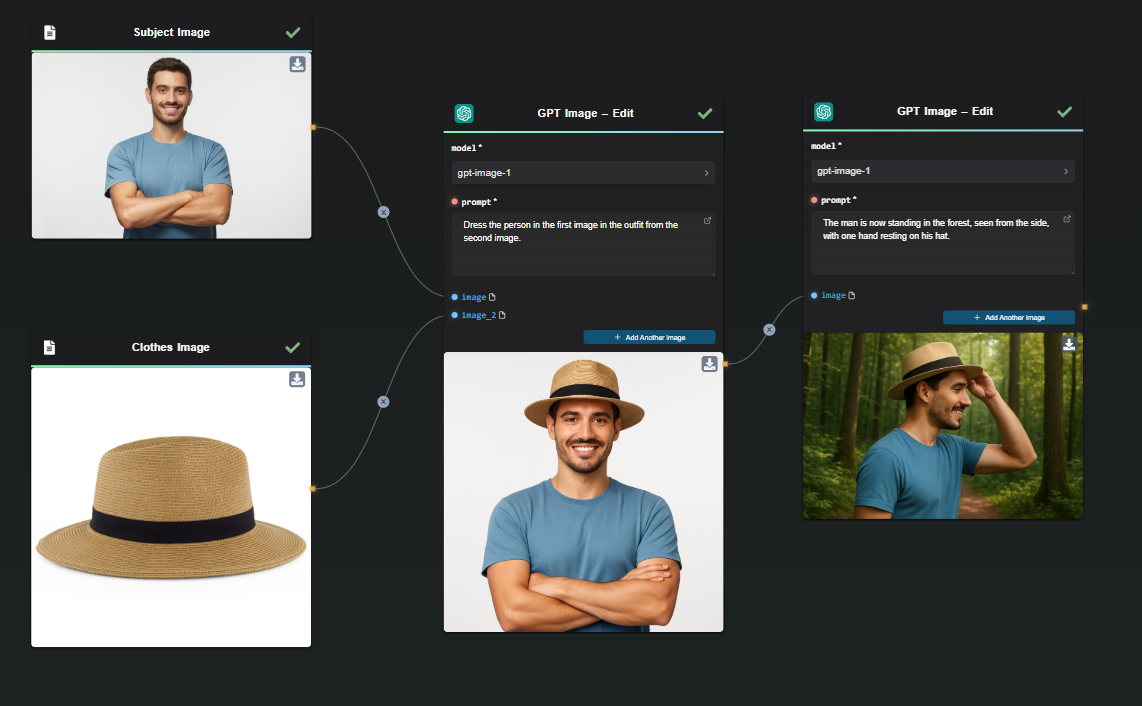
After generating an image, connect its output to a second Replicate node using Google Nano Banana 2. This model takes an image and a text instruction and edits it — change the background, alter the style, remove an object, adjust colors. You get a two-step generate-then-edit pipeline without any code.
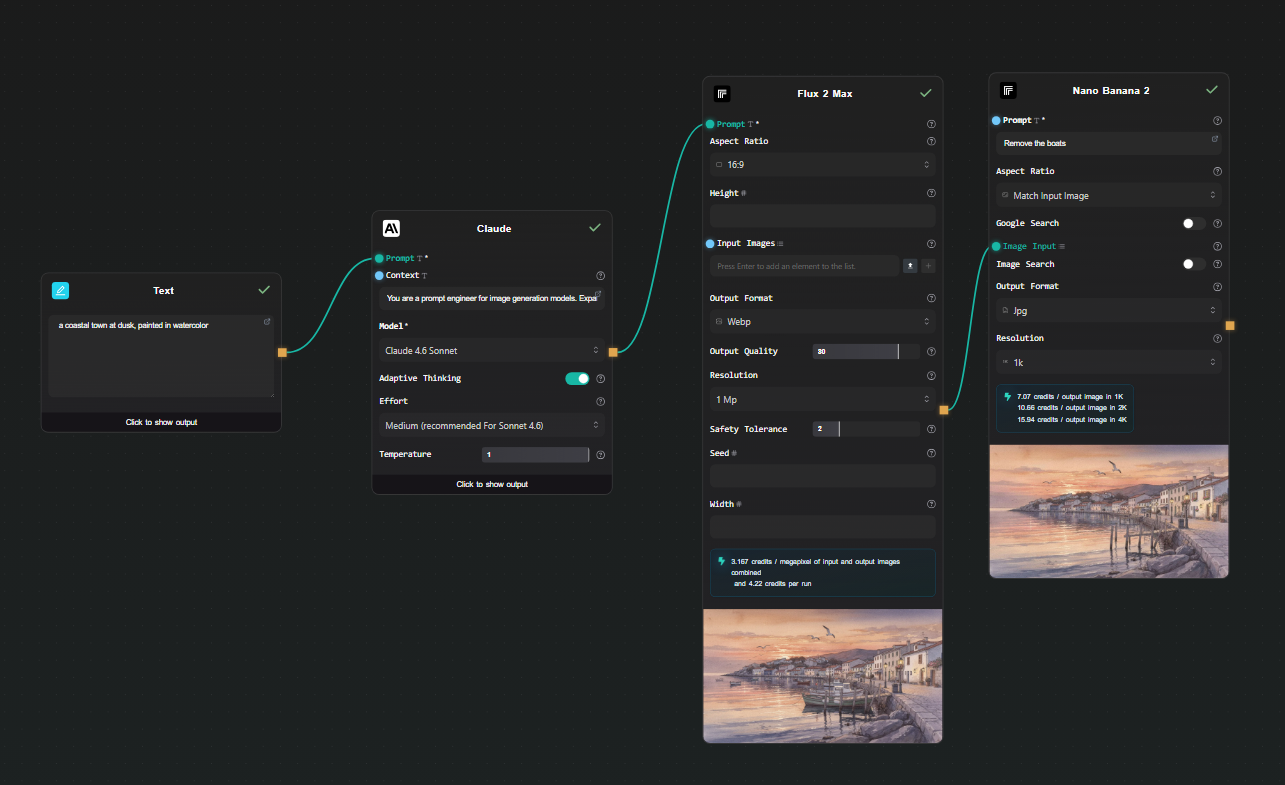
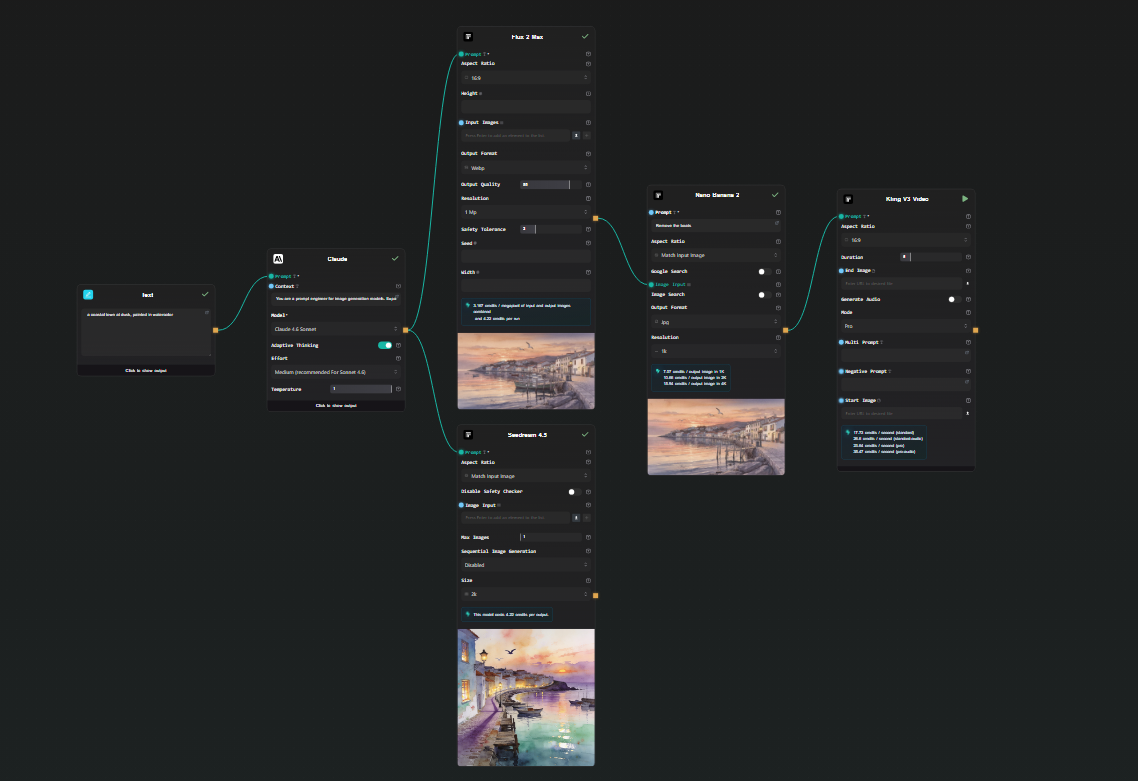
Image to video pipeline with Kling v3

Image to video

Connect a Replicate image output to a Kling v3 Video node. Add a motion prompt in the node's text field. The result is a short video animated from your generated image — text → LLM → image → video, all in one workflow.

Note: Veo 3.1 and Kling v3 both output video with native audio already embedded. You don't need to add a separate audio generation node.

Run multiple models in parallel

Connect the Claude output to two separate Replicate nodes — FLUX 2 Max and Seedream 4.5, for example. Both run from the same prompt simultaneously. You get side-by-side results to compare outputs across models without running the pipeline twice.

Running FLUX 2 Max and Seedream 4.5 in parallel from the same prompt

Expose as an API

Add an API Input node at the start and an API Output node at the end. AI-Flow generates a REST endpoint — you POST a concept string, the full pipeline runs, and you get back the image URL. Useful for integrating into an external application without maintaining the pipeline code yourself.

What this removes from your workflow

Without a visual Replicate API workflow builder, running these pipelines means:

  • Writing replicate.run() calls with the right version IDs
  • Polling for prediction status
  • Downloading the output file from Replicate's temporary URL and re-hosting it if needed
  • Writing a second client call for the next model in the chain
  • Redeploying whenever you change a model or parameter

In AI-Flow, changing a model is a dropdown selection. Changing a prompt is editing a text field. Adding a step is dropping a node and drawing a connection. The iteration cycle is much shorter.

Try it

Add your Replicate API key in AI-Flow's key store, drop a Replicate node on the canvas, and pick a model. The templates library has pre-built image and video generation workflows to start from if you'd rather not build from scratch.

· 5 min read
DahnM20

7 Awesome Ways to Use GPT Image (gpt-image-1) in AI-FLOW

Thinking about how to get the most out of GPT Image (gpt-image-1)?

GPT Image is super versatile and perfect for loads of cool creative projects. Combined with AI-FLOW, it turns your creative ideas into reality with just a few clicks, no coding needed.

Here are 7 incredible ways to start using GPT Image today!


1. 🎽 Instant Fashion Visualization

Ever imagined seeing your clothing designs instantly appear on real models? GPT Image lets you do exactly that. Perfect for fashion brands, designers, and online retailers looking to showcase new collections without costly photoshoots.

Instant Fashion Visualization

👉 Check out our step-by-step guide to fashion visualization!


2. 🐱 Create Consistent Characters for Storytelling

If you’re into storytelling, graphic novels, animations, or even brand mascots, GPT Image helps you create visually consistent characters across scenes effortlessly. Keep your protagonist recognizable everywhere—from dramatic adventures to everyday scenarios.

Generated Scene Featuring Two Droid Cat Characters Meeting

👉 See how easy it is to keep your characters consistent!


3. 🖼️ Extract Precise Visual Assets

Whether you’re creating graphics for marketing, thumbnails for YouTube, or detailed product visuals, GPT Image excels at precisely isolating visual elements onto transparent backgrounds. This means hassle-free image editing without Photoshop nightmares!

Refined Asset Extraction Example from Thumbnail

👉 Learn how to easily extract assets with GPT Image!


4. 🎨 Transform Image Styles Instantly

Want your image turned into anime art? Or maybe a classic oil painting? GPT Image can easily transform the visual style of your images. Just drop an image into AI-FLOW, specify your desired style (anime, vintage, cartoon, or watercolor), and watch the magic happen.

Example prompt:

“Convert this photo into vibrant anime style.”

🎯 Ideal for creative social media content, unique branding materials, or personalized artwork!

Transform Image Styles Example


5. 🚀 Generate Engaging Social Media Graphics

Need quick, high-quality visuals for your social media posts or ads? GPT Image can instantly generate eye-catching graphics tailored to your campaign. From product promos to engaging visuals, keep your audience clicking and liking!

Example prompt:

"Create a vibrant social media graphic featuring a smiling woman using headphones in a bright, energetic style."

Generate Engaging Social Media Graphics Example


6. ✨ Rapid Editing with or without Inpainting

Whether you're a creator, game developer, or product designer, GPT Image is the perfect tool for quickly prototyping visual concepts. Easily generate multiple visual variations for characters, environments, or new product ideas in just a few steps.

In AI-FLOW, you can use GPT Image in Edit mode, either with or without a mask. When using a mask, the model focuses the edits on the selected areas — perfect for precise adjustments like, for example, adding light blue eyes to a droid cat:

Inpainting Example

Without a mask, you can also repurpose the same image in a new context. For instance, you can ask GPT Image to add promotional text, ideal for creating engaging social media posts or marketing materials — like this promotional post for a pet droid cat:

Generate Engaging Social Post Example


7. 📚 Educational Visual Aids & Infographics

Teachers and educators, say goodbye to boring lessons! GPT Image helps you instantly create visual aids, diagrams, and infographics to enhance classroom engagement. Quickly illustrate complex concepts and keep your students hooked.

Example prompt:

"Generate an infographic clearly explaining the water cycle for elementary school students."

Infographic Example

🛠️ How AI-FLOW Makes It Easy

The best part? AI-FLOW lets you combine the power of GPT Image with:

  • Repeatable workflows: Save your processes and reuse them effortlessly.
  • Parallel processing: Generate multiple visuals simultaneously, saving tons of time.
  • Custom API keys: Manage your own GPT Image API key directly within AI-FLOW, controlling costs and optimizing usage.

Just drag, drop, and create—no coding required!


✅ Ready to Get Creative?

Whether you're visualizing fashion, extracting graphics, or generating eye-catching content, GPT Image integrated in AI-FLOW is your all-in-one creative solution. Try it out today—creativity awaits!

👉 Start using GPT Image in AI-FLOW now!

· 4 min read
DahnM20

Flux Redux Dev: A Comprehensive Guide to Image Generation

Flux Redux Dev, an innovative model for creating image variations, is now accessible through the Replicate Node in AI-FLOW. This guide will explore how Flux Redux Dev can enhance your design projects, how to use it effectively, and how it compares to other image refinement tools.

Template Restyling - FLUX Redux - Base ImageTemplate Restyling - FLUX Redux - Variation Image

Why Choose Flux Redux Dev?

Flux Redux Dev provides a unique solution for generating image variations while maintaining the core elements of the original. It is designed to help designers, content creators, and developers efficiently iterate on visual concepts. With its advanced image generation techniques, Flux Redux Dev is a powerful tool for refining visuals and exploring creative directions.

Flux Redux Dev Screenshot

Key Features of Flux Redux Dev

Flux Redux Dev delivers high-quality image outputs with subtle variations, making it ideal for design refinement. Here are some of its standout features:

  • Image Variation: Create multiple design alterations without losing the foundational elements of the original image.
  • Advanced Configuration: Customize settings such as aspect ratio, guidance, megapixels, and inference steps to tailor the output to your needs.
  • Safety Checker: Enable or disable the safety checker for added flexibility in content generation.

Advantages and Benefits

Using Flux Redux Dev offers several advantages:

  • Efficiency: Quickly generate consistent image variations, saving time and effort.
  • Flexibility: Adjust output settings to achieve tailored results that meet specific project requirements.
  • Precision: Maintain the original image's essence while introducing subtle differences, ensuring high-quality outputs.

Potential Use Cases

Flux Redux Dev can be applied in various scenarios, such as:

  • Fashion Design: Creating variations of clothing items for different collections.
  • Content Marketing: Developing a series of themed visuals for campaigns.
  • Digital Art: Exploring new directions and styles in artwork.

Restyling is also available through the FLUX Pro 1.1 Ultra, using Redux behind the scene if an image is provided as input.

Template Restyling - FLUX 1.1 Pro Ultra - Transform Your Images with AI - cat anime artworkTemplate Restyling - FLUX 1.1 Pro Ultra - Transform Your Images with AI - cat traditionnal ink

To learn more, you can check this article : Restyling with FLUX 1.1 Pro Ultra

Start Using Flux Redux Dev in Your Workflows with AI-FLOW

AI-FLOW is a versatile platform that allows you to connect multiple AI models seamlessly, automate processes, and build custom AI tools without extensive coding knowledge. Whether you're automating content creation, experimenting with various AI models, or managing data, AI-FLOW provides the tools you need to streamline your projects.

You can easily experiment with Flux Redux Dev by opening the "Image Variations" template in AI-FLOW.

Ready to Transform Your Projects with Flux Redux Dev?

Get started for free and explore the potential of Flux Redux Dev by visiting AI-Flow App. Unleash your creativity and take your projects to the next level with the power of AI-driven image generation!


Additional Resources

For more detailed information, refer to the following resources:

· 8 min read
DahnM20

FLUX 1.1 Pro: A Comprehensive Guide

FLUX 1.1 Pro, the latest advancement in generative AI technology developed by Black Forest Labs, is now available through the Replicate Node in AI-FLOW. In this guide, we'll explore how FLUX 1.1 Pro can revolutionize your projects, how to run it, and how it compares to other popular models like its predecessor, FLUX Pro, and Stable Diffusion 3.

Why Choose FLUX 1.1 Pro?

FLUX 1.1 Pro is three times faster than FLUX Pro, offering significant improvements in image quality, prompt adherence, and diversity. It sets a new standard in AI-driven image creation, making it an excellent choice for both seasoned developers and beginners across a range of applications. FLUX 1.1 Pro is currently the best text-to-image model available.

OCR Workflow with Amazon Textract

Source: Artificial Analysis

Comparing FLUX 1.1 Pro to FLUX Pro and Stable Diffusion

Choosing an AI model requires understanding how it measures up to other available options. Let’s use a sample prompt to illustrate the capabilities of these models:

A realistic white tiger standing on a rocky ledge in a dense rainforest, light rain falling around it. The background features lush green foliage, towering trees, and mist rising from the forest floor. Soft, diffused light from an overcast sky creates a mystical atmosphere. On a nearby rock, the words 'Rainforest Monarch' are carved.

This prompt provides enough elements to thoroughly evaluate each model's precision and creativity.

FLUX 1.1 Pro vs. FLUX Pro

In the comparison below, FLUX 1.1 Pro is at the top, while FLUX Pro is at the bottom.

OCR Workflow with Amazon Textract

The difference is clear: FLUX 1.1 Pro generates a more realistic-looking tiger with a richly detailed background, resulting in a more immersive scene. FLUX Pro, on the other hand, missed the text prompt in one of its generations.

Note: Each model was given a single attempt—no retakes, no cherry-picking.

  • Speed: FLUX 1.1 Pro is three times faster than FLUX Pro, making it the ideal choice for time-sensitive projects.

  • Image Quality: Improved prompt adherence and diversity mean FLUX 1.1 Pro produces superior images compared to FLUX Pro.

  • Cost: Priced at just 4 cents per image, FLUX 1.1 Pro offers a cost-effective solution for high-quality image generation.

  • Prompt Upsampling: FLUX 1.1 Pro includes an optional prompt upsampling feature for enhanced image generation. (not enabled for the test)

  • Custom Ratios: It allows more flexibility in aspect ratio customization than its predecessor.

    FLUX 1.1 First GenerationFLUX 1.1 Second Generation
    FLUX Pro First GenerationFLUX Pro Second Generation

FLUX 1.1 Pro vs. Stable Diffusion 3 Large

OCR Workflow with Amazon Textract

Again, this was a one-shot generation for each model. The results speak for themselves—FLUX 1.1 Pro significantly outperforms Stable Diffusion 3.

  • Performance: FLUX 1.1 Pro is faster and generates higher-quality images, especially in high-resolution settings.
  • Customization: Offers advanced customization options, providing greater control over output compared to Stable Diffusion.
  • Limitations: FLUX 1.1 Pro currently lacks an image-to-image feature.
  • Overall Quality: FLUX 1.1 Pro consistently delivers more precise and visually appealing results.

FLUX 1.1 Pro with Prompt Upsampling

For curiosity’s sake, here’s a comparison with prompt upsampling enabled:

Prompt Upsampling

By analyzing the outcome, we can infer what has been added during the upsampling process:

First Image: The focus here is on the tiger's deep, unrealistic teal eyes, giving it a mythical quality. There is a new kind of brown texture on the rock, making it appear less perfect and more integrated into the environment. I also suspect that the upsampling added the large tree in the background.

Second Image: In this version, the tiger's position appears more defined. I believe the upsampling introduced the waterfall in the background, as well as the silhouette of a mountain. Additionally, the area around the tiger's head is less cluttered, making it the focal point in the now more open space. The rock also features additional texture.

In conclusion, prompt upsampling is a fascinating tool that can add significant detail, realism, and improved composition compared to a standard prompt used by someone less experienced. However, the downside is the unpredictability of the direction in which upsampling will take the image.

High Reproducibility with Consistent Prompts and Seeds

FLUX 1.1 Pro excels at generating consistent results, allowing precise image modifications by adjusting the prompt rather than relying on inpainting.

Experiment: FLUX 1.1 Pro vs. Stable Diffusion 3.5 Large

To demonstrate its consistency, we conducted a test using the same seed for all generations while making minor prompt adjustments. Below is a comparison of FLUX 1.1 Pro and Stable Diffusion 3.5 Large:

Consistency FLUX VS SD

Try It Yourself

  • Seed: 28
Prompt Variations
  1. Rainforest Setting
    A realistic white tiger standing on a rocky ledge in a dense rainforest, light rain falling around it. The background features lush green foliage, towering trees, and mist rising from the forest floor. Soft, diffused light from an overcast sky creates a mystical atmosphere. On a nearby rock, the words 'Rainforest Monarch' are carved.

  2. Mountain Setting
    A realistic white tiger standing on a rocky ledge in a dense mountain, light snow falling around it. The background features lush white foliage, towering trees, and mist rising from the moutain floor. Soft, diffused light from an overcast sky creates a mystical atmosphere. On a nearby rock, the words 'Mountain Monarch' are carved.

  3. Roaring Tiger in the Rainforest
    A realistic white tiger standing on a rocky ledge in a dense rainforest, its mouth open in a powerful roar. Light rain falls around it. The background features lush green foliage, towering trees, and mist rising from the forest floor. Soft, diffused light from an overcast sky creates a mystical atmosphere. On a nearby rock, the words 'Rainforest Monarch' are carved.

N.B : Do not enable prompt upsampling when you want to achieve consistent results.

Key Observations

FLUX 1.1 First GenerationFLUX 1.1 Second GenerationFLUX 1.1 Third Generation

FLUX 1.1 Pro maintains high consistency with the same seed, allowing precise control over individual elements. For instance:

  • The tiger remains in the exact same position, even when the background changes entirely.
  • Adjusting the tiger’s mouth does not significantly alter the background.

By contrast, Stable Diffusion tends to regenerate the entire image when changing the background, making it harder to maintain consistency.

Consistency Beyond Landscapes

This level of control extends to character consistency as well. While not always flawless, FLUX 1.1 Pro performs exceptionally well when the prompt is structured correctly.

Check out our in-depth guide on generating consistent AI characters: Read more.

Start Using FLUX 1.1 Pro in Your Workflows with AI-FLOW

AI-FLOW is a powerful platform where you can connect multiple AI models seamlessly, automate processes, and build custom AI tools without extensive coding knowledge. Whether you’re automating content creation, experimenting with various AI models, or managing data, AI-FLOW has the tools you need to streamline your projects.

You can easily experiment with FLUX 1.1 Pro by using the Replicate Node in AI-FLOW. Simply drag the node into your workflow and start generating stunning images in seconds.

Ready to Transform Your Projects with FLUX 1.1 Pro?

Get started for free and explore the potential of FLUX 1.1 Pro by visiting AI-Flow App. Unleash your creativity and take your projects to the next level with the power of AI-driven image generation!


Additional Resources

For more detailed information, refer to the following resources:

· 4 min read
DahnM20

Generate Consistent Characters Using AI: A Comprehensive Guide

Are you looking to create consistent and cohesive characters in your AI-generated images? This guide will walk you through practical methods to achieve uniformity in AI character generation. It is part of our broader series on How to Automate Story Creation.

The Challenge of Consistent AI Image Generation

AI-powered image generation is an incredible tool, but it often introduces randomness, making it challenging to produce consistent results. This guide does not present state-of-the-art techniques but instead shares tested experiments to help you achieve more uniform character images.

While the methods discussed are not foolproof, they provide a foundation to develop your approach to consistent AI character generation.

Method 1: Precise Prompt Descriptions

One of the most crucial aspects of image generation is crafting high-quality prompts. If your descriptions are detailed and consistent, you are more likely to achieve uniform results across multiple images.

To enhance precision, AI can assist in generating descriptive prompts. For example, I started with an existing AI-generated image and asked ChatGPT to describe it accurately. This description was then used as a prompt in Stable Diffusion 3.

First Generation

Despite similarities, the AI missed details such as the character’s age. By refining the prompt to specify a 16-year-old character, the output became more consistent.

Second Generation

In this iteration, the AI misinterpreted hair color due to lighting effects in the original image. Using StabilityAI’s Search and Replace feature, I adjusted the description from red hair to brown hair.

Third Generation

Similarly, I applied Search and Replace to correct the depiction of the character’s pet.

Fourth Generation

By refining the prompt with specific details, the results became consistently aligned with the initial vision.

Tip: Including the character’s name in the prompt can improve consistency across multiple generations.

Method 2: Maintaining the Same Seed and Prompt

Once you have an effective prompt, you can achieve a variety of results while maintaining consistency by keeping track of the exact seed used.

For example:

AI-FLOW Template - Base ImageAI-FLOW Template - Base ImageAI-FLOW Template - Base ImageAI-FLOW Template - Base Image

All these images were generated with the same seed and nearly identical prompts, tweaking only minor details. These were created using FLUX Pro 1.1.

By adjusting parameters such as aspect ratio, you can generate even more variations.

Method 2 - 1

Method 2 - Flow

Tip: Once you have a reliable prompt and seed, experiment by progressively altering sections of the prompt to maintain consistency while refining details.

Method 3: Adjusting Character Expressions

Once a consistent character design is established, you may want to generate variations in facial expressions.

For this, models such as fofr/expression-editor are highly effective.

This model allows you to manipulate facial parameters like smiles, eyebrow positioning, and face tilt to create expressive variations.

Method 3 - Expression Adjustments

Method 4: Utilizing Dedicated Models for Consistency

Using dedicated AI models like fofr/consistent-character in combination with the Replicate Node can help generate different facial angles while maintaining character consistency.

Face Angle Generation

Note: These models work particularly well for realistic characters but may make cartoon-style characters appear more lifelike. Experimentation is key.

Once you have multiple consistent face angles and expressions, you can integrate them into new images for even more refined character consistency.

Conclusion and Next Steps

This guide provides foundational techniques for achieving character consistency in AI-generated images. By refining prompts, maintaining seed consistency, and leveraging expression editors, you can create visually cohesive and believable characters.

Stay tuned for Part 2, where we will explore advanced methods for refining and completing character generation.

Start experimenting with these techniques today using AI-FLOW.

· 2 min read
DahnM20

Introducing Enhanced StabilityAI Integration in AI-FLOW

With the integration of StabilityAI's API into AI-FLOW, we've broadened our suite of features far beyond Stable Diffusion 3. This integration allows us to offer a versatile range of image processing capabilities, from background removal to creative upscaling, alongside search-and-replace functionalities.

Given the expansive set of tools and the ongoing advancements from StabilityAI, we've adopted a more flexible integration approach, akin to our implementation with the Replicate API. Our goal is to support automation and rapid adoption of new features released by StabilityAI.

StabilityAI feature showcase

Here's a rundown of the features now accessible through AI-FLOW, as per the StabilityAI documentation:

  • Control - Sketch: Guide image generation with sketches or line art.
  • Control - Structure: Precisely guide generation using an input image.
  • Edit - Outpaint: Expand an image in any direction by inserting additional content.
  • Edit - Remove Background: Focus on the foreground by removing the background.
  • Edit - Search and Replace: Automatically locate and replace objects in an image using simple text prompts.
  • Generate - Core: Create high-quality images quickly with advanced workflows.
  • Generate - SD3: Use the most robust version of Stable Diffusion 3 for your image generation needs.
  • Image to Video: Employ the state-of-the-art Stable Video Diffusion model to generate short videos.
  • Upscale - Creative: Elevate any low-resolution image to a 4K masterpiece with guided prompts.

These enhanced capabilities are great assets for your image processing workflow. Explore these features and find innovative ways to enhance your projects! Try it now!

· 2 min read
DahnM20

Introducing Stable Diffusion 3 in AI-FLOW v0.6.4

AI-FLOW has now integrated Stable Diffusion 3, a significant upgrade in our image generation toolkit. This new version offers enhanced capabilities and adheres more closely to the prompts you input, creating images that truly reflect your creative intent. Additionally, it introduces the ability to better incorporate text directly within the generated images.

Visual Comparison: From Old to New

To illustrate the advancements, compare the outputs of the previous Stable Diffusion node and the new Stable Diffusion 3 node using the prompt:

The phrase 'Stable Diffusion' sculpted as a block of ice, floating in a serene body of water.

The difference in detail and fidelity is striking.

Example

Model Options: Standard and Turbo

Choose between the standard Stable Diffusion 3 and the Turbo version. Note that with the Turbo variant, the negative_prompt field is not utilized, which accelerates processing while maintaining high-quality image generation.

Enhance Your Creative Process

Experiment by combining outputs from Stable Diffusion 3 with other APIs, such as the instantmesh from Replicate API that generates a mesh from any given image input. This integration opens new possibilities for creators and developers.

Example

Looking Ahead

Expect more enhancements and support from StabilityAI in the coming weeks as we continue to improve AI-FLOW and expand its capabilities.

Get Started

Dive into a world of enhanced image creation with Stable Diffusion 3 on AI-FLOW. Experience the power of advanced AI-driven image generation. Try it now!